
In this guide, we’ll tell you How to connect Airbrush Hose to Compressor without much hassle easily.
We’ll also discuss how you can connect the airbrush hose to a compressor at home without needing help from a professional.
You have to follow the instructional guide that comes with the package, or you can watch any YouTube video or read any manual to figure out the whole process.
We’ve added the whole connecting procedure ease so that you can easily connect it just by reading this process. Let’s begin!
How To Connect Airbrush Hose To Compressor In 5 Easy Steps
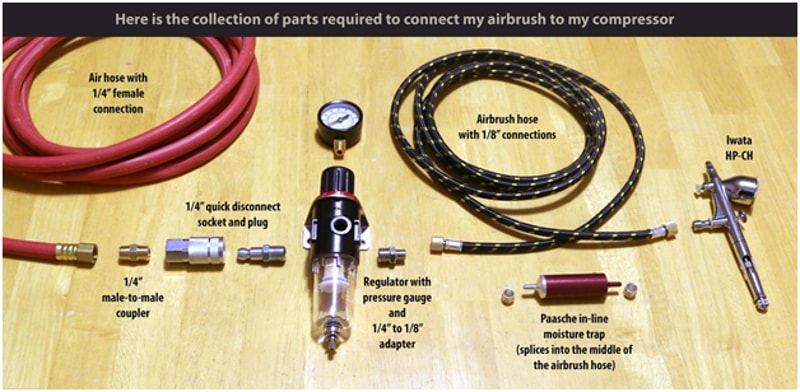
After reading this, you can easily connect the airbrush hose to the compressor. But to connect the airbrush hose to a compressor, you’ll need the following items.
- Pressure Regulator
- Couplers & Plugs
- Moisture Trap
- Airbrush Air Hose
- Airbrush Quick Connect
Step 1: You’ll Need A Pressure Regulator

Whenever it comes to using an airbrush, a pressure regulator is perhaps one of the essential equipment to have. Most airbrushes require a specified air pressure limit to function properly.
We realize that most air compressors include a regulator, and if yours does, congratulations, you’ve come to the correct place. We are aware, too, that pressure regulators are likely to fail with time.
If yours is broken, you’ll need to replace it immediately.
It will be hard to use an airbrush without the capacity to control the air pressure, particularly when airbrushing small details.
You must install your air pressure regulator before the moisture trap. The pressure regulator should be placed in the center of the airline to make entry to it much simpler — particularly if your compressor is positioned far away from where you’ve been airbrushing.
Please note that by relocating the pressure regulator down the airline farther from the air compressor, you will be exerting more stress on the air line up to the regulator, given the high pressure in the line. This implies you’ll need to invest in a high-quality air hose that can withstand high air pressure for a long time.
Note: If you don’t have both a functional regulator and a moisture trap (which will be covered later), you may get a pressure regulator with moisture trap built-in. In our opinion, this will be the better option if you require both.
Step 2: Couplers & Plugs

The connections needed to connect an airbrush to an air compressor are the most frequently asked about at this process stage. In most cases, the standard air compressor connections and couplers will be enough for the bulk of the airline.
When it comes to attaching the “Airbrush” Air hose onto the ends of the airline, the only place in the whole airline which will normally require an atypical connector is when it comes to joining the airline.
However, the good news is that most airbrush hoses will come with an adaptor that will simply connect to your standard air hose connector. Three couplers and three plugs are required for the airline arrangement. You’ll need a total of six adapters (or three plug/coupler pairs).
However, depending on your needs, you may want more or less; it all relies on the configuration you’re attempting to create and the distance between the compressor and the airbrush work area.
Step 3: Shop Air Hose

This air line’s next component will most likely be a “Shop Air Hose.” However, remember that this is an optional component of the line since it will be determined by the position of your compressor and your workspace.
Suppose your compressor is a long distance from the area where you plan to airbrush. Then you’ll most likely use a shop air hose to cover the gap.
Step 4: Airbrush Air Hose

You’re getting close to the finish of the airline construction. At this phase, you’ll connect the airbrush air hose to the airbrush, and it will then connect to the airbrush.
Airbrush air hoses are designed exclusively for use with airbrushes. It’s considerably smaller than a shop air hose and is made to fit the thread size seen on most airbrushes.
The most common size of airbrush thread is 1/8′′. But, the diameter of the airbrush you use may vary based on the manufacturer.
Step 5: Airbrush Quick Connect

For attaching your airbrush to your airbrush air hose, you don’t need a fast disconnect anymore. It is, however, well worth the money because it makes connecting and disconnecting the airbrush from the airline so simple.
It’s as simple as threading the female ends of the fast disconnect onto the airbrush air hose and the male end onto the airbrush itself. Then it’s just connecting and disconnecting like a standard shop compressor plug and coupler.
In addition, some airbrush fast disconnect alternatives have a MAC valve that allows for quick and simple air pressure control without trying to run over to the compressor to alter the regulator.
Frequently Asked Questions
Is it possible to use an airbrush without using a compressor?
No, you won’t be able to. To function, an airbrush requires a source of air.
We heard about utilizing bottled air, but having an air compressor will be cheaper overall. If you just plan to airbrush a few times, this is something to think about. In all other scenarios, save money until you can purchase an air compressor.
What is an airbrush, exactly?
An airbrush is a tiny pneumatic (air-operated) equipment that sprays viscous liquids such as paint, dyes, pigments, dyes, varnishes, and other similar products. It is gripped in the palm and used in the same manner as a pen.
How to connect the airbrush hose to the compressor?
We have described every step in detail above. If you have read it carefully, you must be able to understand it. Still, you can watch relevant videos or contact us if you have any queries.